Generating branded social-preview images at build time
Share a link to one of your pages on LinkedIn, Slack, or X and the platform reaches back to your site, looks for an og:image, and renders a preview card from it. If you don’t supply one, you get whatever the scraper guesses: usually nothing, or a stray logo cropped badly. A good preview image is cheap marketing: it’s the difference between a bare blue link and a branded card with a title and a tagline.
The catch is volume. A portfolio has a dozen projects; a blog has dozens of posts. Hand-designing a 1200×630 card for each one in Figma is the kind of chore that never gets done. So I didn’t. I render them (one per project) from a single HTML template, driven by headless Chrome, as a build step. This post is how that pipeline works, and the one palette-compression trick that took the output from ~300 KB per card to ~60 KB without any visible loss.
One card per page, automatically
The whole thing rests on a fact that’s easy to forget: a social card is just a 1200×630 web page. If you can render a web page, you can render a card. And the most faithful HTML-to-pixels renderer in the world is already on your machine. It’s the browser.
So the design is: keep the content of each card in structured data you already maintain, write one HTML template that lays out a card, and for each entry, render the template with that entry’s data and screenshot it. My portfolio’s single source of truth is a projects.json that drives the whole site; the generator walks it and emits one PNG per project:
data = json.load(open(ROOT / "content/projects.json"))
for p in data["projects"]:
    params = urllib.parse.urlencode({
        "name": p["name"],
        "tagline": p["tagline"],
        "role": p.get("role", ""),
        "stack": ",".join(p.get("stack", [])[:5]),
    })
    out = OUT / f"{p['id']}.png"
    # ...render and screenshot `template.html?<params>` -> out
The data already exists; the cards fall out of it for free. Add a project to the JSON, re-run the script, and a matching branded card appears. No design tool in the loop.
Templating with query strings
The cheapest possible templating engine is one you already have in every browser: the query string. Instead of running the HTML through Jinja or building a DOM server-side, I render a static template and let a few lines of in-page JavaScript read location.search and fill in the blanks. The generator above URL-encodes each project’s fields; the template unpacks them:
<div class="mid">
  <h1 id="name"></h1>
  <p class="tagline" id="tagline"></p>
</div>
<div class="chips" id="chips"></div>
<script>
  const q = new URLSearchParams(location.search);
  const name = q.get('name') || '';
  document.getElementById('name').textContent = name;
  document.getElementById('tagline').textContent = q.get('tagline') || '';
  document.getElementById('role').textContent = q.get('role') || '';
  document.getElementById('mono').textContent = name.slice(0, 2).toUpperCase();
  const stack = (q.get('stack') || '').split(',').filter(Boolean).slice(0, 5);
  document.getElementById('chips').innerHTML =
    stack.map(s => `<span class="chip">${s}</span>`).join('');
</script>
The body is set with textContent, not innerHTML, so a stray < in a project name can’t break the layout. The styling is plain CSS: a radial gradient, a dotted grid overlay, a couple of web fonts, flexbox to lay out a header, a hero title, and a row of stack “chips.” Because it’s a real page, I can open template.html?name=Demo&tagline=... in my own browser and tweak the design live, then trust that the build produces pixel-identical output. The template is the design tool.
Screenshotting with headless Chrome
Chrome can take a screenshot straight from the command line, no Puppeteer or Playwright required. The --screenshot flag “takes a screenshot of the target page and saves it,” and pairs with --window-size to fix the dimensions. We want exactly 1200×630 (the Open Graph preview size that Facebook, LinkedIn, and X all render cleanly), so we pin the window to that and force a 1× device scale:
subprocess.run([
    "google-chrome", "--headless=new", "--disable-gpu", "--no-sandbox",
    "--hide-scrollbars", "--force-device-scale-factor=1",
    "--window-size=1200,630", f"--screenshot={out}",
    "--virtual-time-budget=4000", f"{TPL}?{params}",
], check=True)
A few of those flags earn their place. --headless=new selects the modern headless implementation: since Chrome 112 it’s the same browser engine as the visible Chrome, “creating but not displaying” windows, so what you screenshot matches what you’d see on screen. It’s the same flag that closed much of the headless-detection gap I leaned on in beating browser fingerprinting, a nice side benefit here since a stealthier headless mode is also a more faithful one. --force-device-scale-factor=1 guarantees one CSS pixel maps to exactly one image pixel, so the output is 1200×630 and not a surprise 2400×1260 on a HiDPI box. And --virtual-time-budget=4000 is the clever one: rather than sleeping for four real seconds to let the web fonts load, it fast-forwards Chrome’s internal clock as if four seconds had passed, then captures, so the fonts paint but the build doesn’t stall.
Under the hood, --screenshot is the CLI surface of the DevTools Protocol’s Page.captureScreenshot command, the same primitive Puppeteer and Playwright call. We just don’t need a driver process to reach it for a one-shot capture.
The PNG8 trick (and when it backfires)
Chrome writes a 24-bit truecolor PNG. For one of these flat cards (a gradient, some text, a dotted overlay) that’s wildly more color depth than the image actually uses, and each card lands around 300 KB. That’s not catastrophic, but multiply it across every project and blog post and it’s real bytes on every share, every crawl, every page that lists the cards.
The fix is color quantization: collapse the image to a 256-color palette and store it as a PNG8. ImageMagick does it in one line:
subprocess.run([
    "convert", str(path), "-strip", "-dither", "None",
    "-colors", "256", f"PNG8:{path}",
], check=True)
The non-obvious part is -dither None. By default, when ImageMagick reduces colors it dithers: it scatters pixels of the available palette colors to fake the missing in-between shades, using a Riemersma (Hilbert-curve) error-diffusion pass. On a photograph that’s exactly what you want: dithering hides the banding you’d otherwise see across a smooth sky.
But on a flat graphic it’s actively harmful, for a reason that’s pure information theory. PNG compresses by finding runs and patterns of identical pixels. Dithering deliberately breaks those runs: it sprinkles high-frequency noise across every gradient to smooth the eye’s perception. That noise is incompressible, so the dithered PNG8 is both noisier and bigger. Turning dithering off lets long runs of identical palette colors survive, which is precisely what the compressor feasts on. On a gradient-and-text card, the gradient quantizes to a handful of smooth bands and PNG packs them tight.
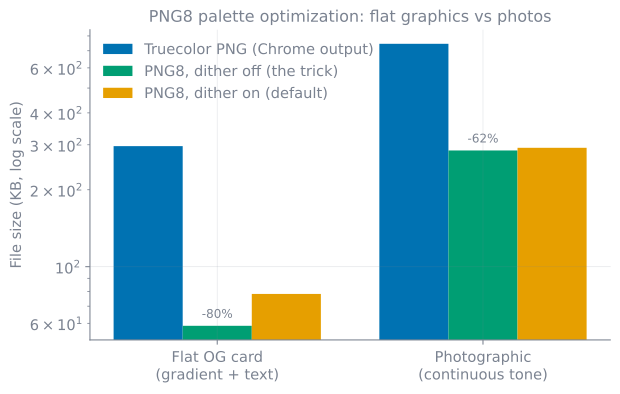
The measured difference on the real card is stark: the truecolor PNG was ~296 KB, the no-dither PNG8 was 59 KB, and the dithered PNG8 was 78 KB. The dithered file ran about a third larger, for a card that looks identical either way.
Measuring the savings
To check the trick isn’t fooling me, I ran it against two inputs: the actual branded card, and a real photograph (Grace Hopper’s portrait, the classic image-processing test image) fit to the same 1200×630 canvas. Same PNG8 step, dithering on and off, real bytes measured with ImageMagick 6.9:
Two things jump out. On the flat card, dither-off PNG8 cuts ~80% and beats dither-on comfortably. The trick works. On the photograph, palette reduction helps noticeably less (~62%), and dithering on vs off barely moves the file (within a couple percent either way), because there are no long flat runs for turning dithering off to preserve. The lesson: this is a flat-graphics optimization. Reach for it on cards, charts, diagrams, and screenshots of UI; for genuine photographs, quantizing to 256 colors throws away tone you’ll miss, and you should stay truecolor or reach for JPEG/WebP instead. The generator guards the step in a try/except so a missing ImageMagick just skips it and ships the truecolor PNG rather than failing the build.
Where I used this
This is the pipeline behind the social cards on my own portfolio. Each project entry in projects.json carries an ogImage path; the build renders the template once per project and writes a palette-optimized PNG to public/images/og/, plus a single static card for the home page. Adding a project is a JSON edit: the branded preview comes along automatically, at a fraction of the byte cost, and I never open a design tool to get it. Share weberist’s link and the card that shows up is one of these.
The shape generalizes well beyond OG images. Anywhere you need to turn structured data into a pixel-perfect image at build time (certificates, receipts, chart thumbnails, report covers), “render real HTML, screenshot it with headless Chrome, then quantize the flat output” is a sturdy little pattern. The browser is the most capable renderer you’ll ever have; you might as well let it do your design work while you sleep.
References
- Open Graph protocol (ogp.me) — defines
og:imageand the structuredog:image:width,og:image:height,og:image:type, andog:image:altproperties. (Link verified.) - Chrome headless mode (Chrome for Developers) — the unified headless implementation since Chrome 112, and the
--screenshot/--window-sizecommand-line flags. (Link verified.) - Getting started with headless Chrome — command-line screenshotting and the
--virtual-time-budgetflag. (Link verified.) - Chrome DevTools Protocol —
Page.captureScreenshot— the underlying capture command (format, clip, viewport) that--screenshotdrives. (Link verified.) - ImageMagick: Color Quantization and Dithering —
-colors, the default Riemersma dither, and disabling it with-dither None/+dither. (Link verified.) - ImageMagick command-line options — reference for
-dither,-colors, and-strip. (Link verified.)
Working on something in this space, or hiring for it?
Keep reading
- Plans an Agent Can Actually ExecuteIf you want a language model to carry out a plan, write the plan for a machine: XML-tagged structure, atomic find/replace edits, patterns defined once, and a verification checklist baked in.July 27, 2026
- Spec-Driven Scaffolding: Parse, Customize, ValidateA reliable code generator isn't one giant prompt. Split it into three stages: an LLM parses a request into a validated spec, a deterministic script customizes a template, and a final gate checks the result. Determinism where you can, an LLM only where you must.July 23, 2026
- How browser fingerprinting catches your scraper: how to pass the testsModern sites fingerprint the device and timing, not just navigator.webdriver. Here's how a stealth Selenium setup injects CDP commands, masks automation markers, and persists realistic state to pass real detection suites.June 29, 2026
Get the next update by email
Build-in-public updates and new posts, delivered as a digest. Double opt-in · no spam · unsubscribe anytime · handled by Buttondown.